Micro learning activities
After having looked at and compared different orientation islands and stations, we have to devise our own activities for one module based on the Global Kids Curriculum. I have chosen the Level 1 module Taking a Closer Look. By the end of this module, they should have learned (mission’s powers):
- Using the computer keyboard to focus, zoom and pan
- Using the camera control feature to focus, zoom and pan
The activity should
- Allows the development of the mission’s powers (see above)
- Is engaging, playful
- Complies with the list of principles for an effective design of an orientation session.
I have decided to create activities for this module because I have seen in several tutorials that camera controls are one of the most important and most-used features of Second Life. I can only agree with this from my own experience and that of my students. As some MUVEnation participants have pointed out when comparing orientation stations, this should even be one of the very first skills that are taught because seeing the screens and pictureboards used to explain SL features require this skills the way the are set up.
I have come up with some ideas to practise zooming and panning. Due to time constraints, I will not be able to fully develop all the steps and create picture boards with the necessary instructions. I will also abstain from describing the instructions I would give.
My ideas
First of all, flying would not be allowed for any of the following activities.
After looking at a pictureboard with instructions on how to zoom to get a closer look, they have to stand on the hot spot and zoom in on an object, picture or board with a text and either read or describe it.

How long does it take until a newbie learns how to see their own face? Here, they will be instructed on how to do that and then have to practise it and take a portait snapshot of themselves.
To practise zooming in on a moving object or avatar, they will be instructed to ALT+click on that object or an avatar and follow where it is going and describe what they are seeing or take snapshots and post to flickr. This is best done in an area where there are walls or hills to prevent seeing the moving avatar directly.
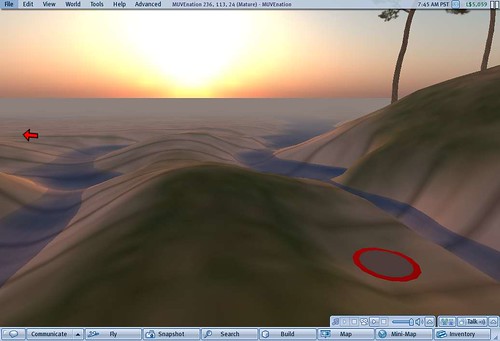
The hot spot marks the area where a box is hidden underground. Avatars would be told that there is a box. Using camera controls or keyboard shortcuts (which would be shown and explained first on a board) the avatar has to pan to find the box and retrieve its content as proof of completion. If they already have the skills to take snapshots, they will be asked to wear the item they have found as proof and take a snapshot of themselves and post it to Flickr.

Now, they would be instructed to pan upwards until they find the box in the air. Find what is on top of the box and, depending on the skills they already have, either take a copy of the item and wear it, take a snapshot or both.

Happy to hear your thoughts.
If any of the MUVEnation newbies wants to test these ideas, let me know.
Update 18 November 2008
Two other question we were asked to addres are:
How was the work with the GKCx?
The GKCx is very comprehensive but I had to read through the modules carefully several times to understand the steps. It was too detailed for me. It’s a lot of text.
What challenges do you foresee?
These activities are very easy to set up and even mobile. Where ever we have the right to rez objects, we can quickly set up the hot spot, boxes and pictureboards. Teachers with minimum experience in building can set it up easly. There is no need for scripting knowledge. For newbies: hand coordination? Mixing up and forgetting when to use which shortcut. But learning and practisng this is the whole purpose of the activity.
Hello Nergiz,
before reading your entry, I had wondered what the floating box and gray+red spot were: I had noticed them while flying and I had even sat on your box (!)
I agree with you that using camera controls is one of the fundamental skills that new user should acquire to feel confident enough while wandering around SL. Also, while it seems easy enough at the beginning, using those controls is more difficult than it seems initially and it requires practice.
This is why in my little task-based activity I had asked my students to take a snapshot of themselves. Yes, ok, it was partly to have an “evidence” that they had completed the activity, but I also wanted to be sure that they had understood how to look closely at things around them and, eventually, at themselves.
I like your idea of the flying box, but I must confess to my shame that I could not find the buried one :-I
Best,
Cvetka/Julie
Hi Nergiz! As a newbie , it was very useful to do this practice.
Can you suggest another one to take video there?
@Cvetka
I’m glad you agree with the importance of learning and practising camera controls. I’ve read your account and saw the snapshots that your students took. You made me laugh…. You didn’t find the treasure box? You have to keep searching and retrieve its content 😉 It’s under the hotspot.
@Ángeles
Thanks so much for testing it! I am happy to hear you found it useful. Did you find the buried box and opened it? There is a freebie in it 🙂
I’ll contact you to see what else you would like to see and about your video question.